Guides

In brief
Xcode is Apple’s free Mac app for building, testing, debugging, and publishing Swift apps for iPhone, iPad, Mac, and more.
Xcode is Apple’s development environment for building software for Apple platforms. It’s the first-party Mac app where developers can write code, organize an app project, run and test their app, find bugs, work with AI coding tools, and prepare the finished app for distribution.
A simple way to think about it is that Xcode is your developer workspace for building an app for Apple platforms.
It’s also a pretty complex piece of software. If you open Xcode for the first time and feel like you have no idea what half the buttons do, that’s completely normal. You don’t need to understand all of Xcode before you start building.
The goal here is to give you a big-picture understanding of what Xcode is and how it helps you build your app.
What is the difference between Xcode, Swift, and SwiftUI?
Before getting deeper into Xcode, it helps to clear up three terms beginners often hear at the same time: Xcode, Swift, and SwiftUI.
Technology | What it is | What you use it for |
|---|---|---|
Xcode | Apple’s development environment | Writing, building, testing, debugging, and distributing your app |
Swift | A programming language | Writing the logic and functionality of your app |
SwiftUI | A user interface framework | Building the screens, buttons, navigation, layouts, and other interface elements |
For example, imagine you’re building a weather app.
You might use Swift to request weather data and decide how your app should process it. You could use SwiftUI to create the user interface that shows the current temperature and forecast.
And you would typically write and run all of that code inside Xcode.
If you want to go deeper on this distinction, read our guide to Swift vs. SwiftUI.
What is Xcode used for?
Apple describes Xcode as a collection of tools for developing, testing, and distributing apps for Apple platforms. It includes a source-code editor, debugging and performance tools, device simulators, interface previews, testing tools, coding intelligence, and distribution features. Apple’s Xcode overview is a good resource once you’re ready to explore the individual tools in more detail.
For a beginner building an iPhone app, you can think of the basic workflow like this:
Create an Xcode project.
Write the code for your app using Swift and frameworks such as SwiftUI.
Add your images, colors, app icon, and other resources.
Configure the platforms and capabilities your app supports.
Build and run the app in Simulator or on a real device.
Find and fix problems.
Archive your finished app.
Upload the build to App Store Connect for TestFlight or the App Store.
There’s a lot more Xcode can do, but those steps cover the basic journey from an empty project to an app you can put in someone’s hands.
What is inside an Xcode project?
When you create an app, Xcode organizes everything that makes up that app into a project.
Part of an Xcode project | What it contains or controls |
|---|---|
Source code | The Swift code that controls your app’s interface, logic, and behavior |
Assets | Images, colors, app icons, sounds, and other resources used by your app |
Project settings | Supported platforms, deployment targets, signing, and other build configuration |
Capabilities | Apple services your app can use, such as push notifications or iCloud |
Localization | Translations and resources used to support multiple languages |
Frameworks and packages | Apple frameworks and third-party dependencies your app relies on |
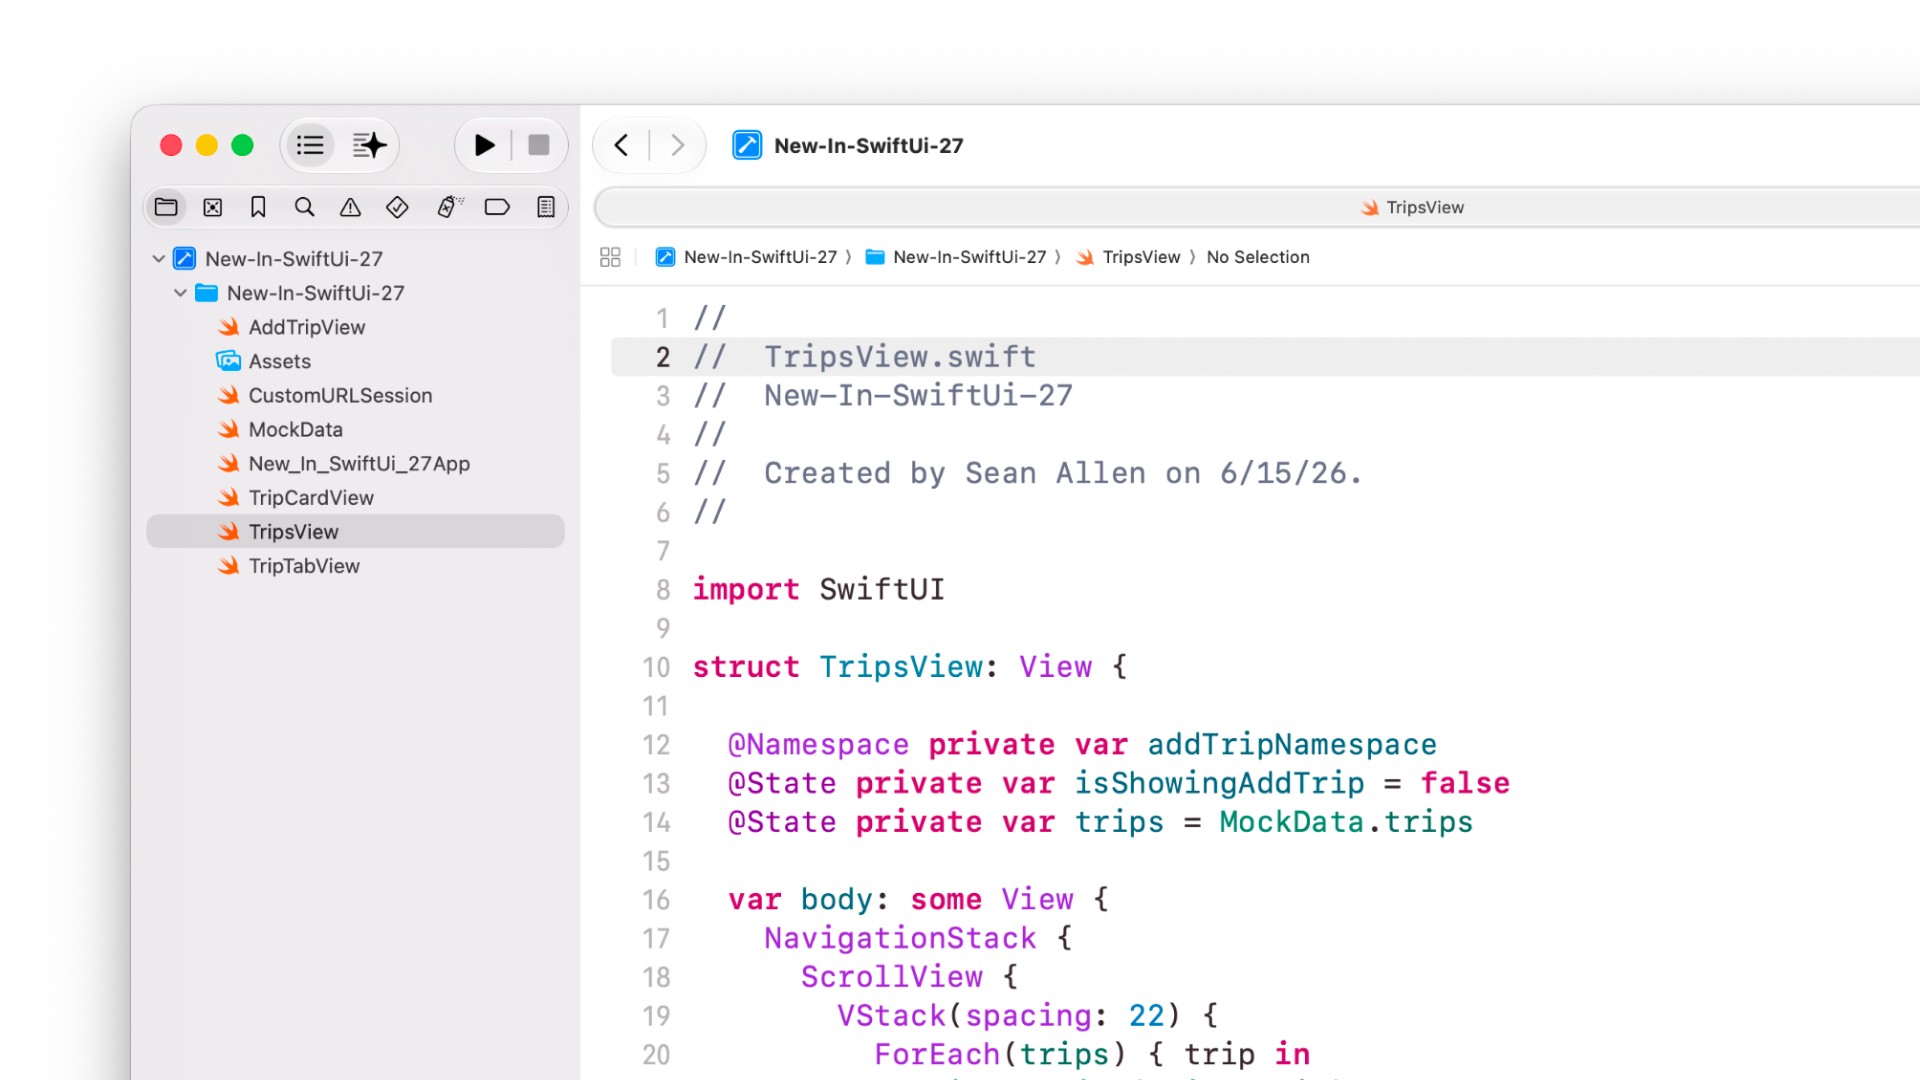
The biggest part will usually be your source-code files. When you select one, Xcode opens it in the source editor, where you can read, write, and modify your Swift code.
You’ll also use your project settings to tell Xcode what you’re actually building.
For example, you can configure which Apple platforms and device types your app supports, which operating-system versions it can run on, and which Apple services or capabilities it needs. Xcode supports projects that target Apple platforms ranging from iPhone and iPad to Mac, Apple Watch, Apple TV, and Apple Vision Pro.
Capabilities become important as your app gets more sophisticated. If you want your app to use features such as push notifications, iCloud sync, or certain other Apple services, part of that configuration happens through your Xcode project.
You don’t need to learn all of these settings when you create your first project. Most of them only matter when your app actually needs them.
How do you test an app in Xcode?
Eventually, staring at your Swift code isn’t enough. You need to see whether your app actually works. That’s where building and running your project comes in.
Xcode compiles your code and turns the pieces of your project into a working application. You can then run that app using Simulator, which lets your Mac simulate Apple devices and operating-system versions.
For an iPhone app, that means you can test your interface on different simulated iPhone models without physically owning every model.
This is a big deal because an app has to adapt to different screen sizes and configurations. Something that looks great on a larger iPhone may have layout issues on a smaller iPhone.
Simulator can also help you test your app across supported operating-system versions and simulate conditions such as location changes, memory warnings, and network conditions.
Should you also test on a real iPhone?
Yes.
Simulator is incredibly useful while you’re building, but you should also run your app on physical devices when possible.
A real device lets you experience things that are difficult to judge from your Mac, including how your interface feels in your hand, real-world performance, hardware behavior, and the overall experience of actually using the app.
Xcode allows you to select either compatible simulated devices or connected physical devices as your run destination.
And you don’t have to pay for the Apple Developer Program just to begin learning and testing an app on your own devices, although free accounts have additional limitations. You can read our Apple Developer Program guide for the full breakdown.
Simulator and real-device testing are both useful, but they serve slightly different purposes.
Testing method | Best for | Main limitation |
|---|---|---|
Xcode Simulator | Quickly testing layouts, different device sizes, OS versions, and common app behavior | It doesn’t perfectly reproduce every piece of real iPhone hardware or real-world performance |
Real iPhone | Testing actual performance, hardware features, touch interactions, and the overall feel of your app | You need access to the physical device you want to test |
Both | Getting the most complete picture before releasing your app | Takes more time than testing in only one environment |
Can you use AI to build apps in Xcode?
Yes, and this has become a much bigger part of Xcode in recent years.
Xcode includes coding-intelligence features that can work with large language models and coding agents. Xcode 26.3 added deeper agentic coding support, including direct integration with OpenAI Codex and Anthropic’s Claude Agent. Apple also exposes Xcode capabilities through the Model Context Protocol, or MCP, so compatible external coding agents can interact with Xcode.
These agents can do more than autocomplete a line of code.
They can work through multi-step tasks, examine project files, search Apple documentation, change project capabilities, build the app, find compiler errors, and attempt to fix those errors.
That can be especially useful for beginners, but AI doesn’t eliminate the need to understand what you’re building. Models can still generate incorrect code, misunderstand what you want, or make changes you didn’t expect.
Think of AI as another tool inside your development workflow, not a replacement for testing and reviewing the finished app.
How does Xcode help you find bugs?
Your app probably isn’t going to work perfectly the first time you build it.
Welcome to app development.
Xcode includes debugging tools that help you figure out what went wrong. Its debugger can pause your app at specific points in the code, inspect values while the app is running, and help you track down problems. Xcode also includes tools for analyzing crashes, memory usage, responsiveness, CPU usage, and other performance characteristics.
You don’t need to master the debugger on day one.
Early on, you’ll probably spend most of your time responding to compiler errors and obvious problems you can see while running the app. As your apps get more complicated, Xcode’s debugging and performance tools become increasingly valuable.

How do you get an app onto the App Store?
Once your app is finished and tested, Xcode can prepare it for distribution. One of the important concepts here is an archive.
Instead of simply running a development version of your app, you create an archive that can be distributed. From Xcode’s Organizer, you can then upload the appropriate build to App Store Connect.
App Store Connect is separate from Xcode. It’s Apple’s web-based service for managing the distribution and business side of your app.
Once your build is uploaded, you can use App Store Connect to manage things such as your product page, TestFlight beta, in-app purchases, pricing, and App Store submission.
If those terms are new to you, we have separate beginner guides explaining App Store Connect and TestFlight.
Do you need to learn all of Xcode before building an app?
Definitely not.
Xcode is a professional development environment with tools designed for everything from someone learning Swift to teams maintaining enormous applications (every app on your Home Screen was built in it).
Trying to learn every menu, inspector, debugger, profiling tool, build setting, and distribution option before making your first app would be a terrible way to get started.
To put it into perspective, I've been a professional iOS developer for over a decade and I bet I only know half of what Xcode can do. It's a lot.
Learn the pieces as you need them.
For your first app, focus on understanding how to:
Create and open a project
Find your source-code files
Edit Swift code
Build the project
Run the app
Use Simulator
Read basic errors
Once those pieces start feeling comfortable, the rest of Xcode will make a lot more sense because you’ll have a reason to use it.
Is Xcode the same as VS Code or other editors?
No. Xcode and Visual Studio Code, or VS Code, are both tools you can use while programming, but they play very different roles when you’re building an app for Apple platforms.
VS Code is a general-purpose code editor that supports many programming languages and platforms. With the Swift extension installed, you can write Swift code in VS Code and get features such as code completion, navigation, debugging, and package support.
Xcode is much more specific to Apple development. It includes Apple’s SDKs, compilers, Simulator, code-signing tools, debugging tools, and the distribution workflow needed to turn your Swift code into an iPhone, iPad, Mac, or other Apple-platform app.
So while you can write Swift code outside of Xcode, tools like VS Code don’t replace the Apple development toolchain when you want to build and ship an iPhone app.
A simple way to think about it is:
Tool | Main role | Can you use it for Swift? | Role in shipping an iPhone app |
|---|---|---|---|
Xcode | Apple’s complete development environment | Yes | Provides Apple’s build, Simulator, signing, and distribution tools |
VS Code | General-purpose code editor | Yes | Can be used to write Swift, but relies on Apple’s development toolchain on a Mac for iOS app workflows |
Bitrig | AI development environment focused on native Apple apps | Yes | Uses the Xcode toolchain under the hood while providing a different interface for building and shipping Swift apps |
This distinction also explains how newer development tools like Bitrig fit into the picture.
You don’t necessarily have to spend all of your time working directly inside the Xcode interface to build an iPhone app. Bitrig provides an AI-powered environment specifically for building native Swift apps, while using Apple’s Xcode toolchain underneath.
That means you can work in a different development environment without giving up the native Apple technologies required to build, test, and ship the finished app.
Frequently asked questions
Is Xcode free?
Yes. You can download Xcode and start learning and building apps without paying for the Apple Developer Program. A paid Apple Developer Program membership becomes important when you want to access certain developer services and distribute your app through TestFlight or the App Store.
You can read our Apple Developer Program guide for more details.
Do I need a Mac to use Xcode?
Yes. Xcode is Apple’s development environment for macOS. Apple distributes Xcode through the Mac App Store and Apple Developer downloads.
Is Xcode only for building iPhone apps?
No. Xcode is used to develop software across Apple’s platforms, not just iPhone apps. That includes iPad, Mac, Apple Watch, Apple TV, and Apple Vision Pro.
Is Xcode the same thing as Swift?
No. Swift is a programming language. Xcode is the development environment where you can write and work with Swift code.
Similarly, SwiftUI isn’t a programming language or a replacement for Xcode. It’s a framework you can use with Swift to build user interfaces.
Can Xcode run an iPhone app without a real iPhone?
Yes. Xcode includes Simulator, which lets you run your app in simulated Apple-device environments directly on your Mac. You should still test on real hardware before releasing an app.
Do I have to work directly in Xcode to build an iPhone app?
Not necessarily.
Other development environments and AI coding tools can provide a different interface while still relying on Apple’s underlying development tools.
For example, Bitrig builds native Swift apps using the Xcode toolchain and can run them with Xcode Simulator. It can also handle workflows such as CloudKit configuration, App Store listings, App Store builds, TestFlight distribution, and App Store submission.
The bottom line
Xcode is Apple’s development environment for building, testing, debugging, and distributing apps for Apple platforms.
If you’re brand new to iPhone development, don’t worry about learning everything Xcode can do. Start by understanding the basic workflow: write some Swift, build your project, run it in Simulator, test it on a real device, and gradually learn the other tools as your app requires them.

Try Bitrig
If Xcode feels overwhelming, you should check out Bitrig. It's an AI-powered development environment focused specifically on building native Swift apps for Apple platforms.
It handles a lot of the Xcode complexity for you under the hood so you can spend your time focusing on the app you actually want to build.
Topics
Xcode
Developer Workflow
Simulator

